Adblocking in the cloud
Part 1 - Intro
I hate ads. Don’t get me wrong. I am fine to get informative/interest based ads. It becomes a bit hard when I am hit with a bunch of irrelevant ones and the amount of tracking that happens in the background. I initially used adblock plugins on the browser - which work fine to certain extent. But if I have to block it completely I have to use a Pi-hole setup.
Pi-hole is a DNS level ad blocker. Once up and set as the DNS server
of the local network, it blocks out all the DNS queries from the client
that are trying to resolve any domains that server ads. All this is done
without installing any software on the client side. The name Pi-hole
comes from the fact that this is usually run as a service on a Raspberry
Pi a small all-in-one PC. I have a Raspberry-pi that I used to setup Pi-hole at my home. I added
the Pi node as my DNS server in my router for my local network. This
blocks all the ads on all the devices on my network and also give me a
view of each client activity(if enabled). The setup works great on
clients connected over wi-fi or ethernet to the router. But how to block
the ads and unwanted domains when on mobile network?
For this I have to run the pi-hole service on a public cloud and use that as a DNS resolver on my phone. If I open up port 53 on the cloud VM to the world (which is required as the public IP of the client from where the requests are coming will keep changing), it can be used for DNS amplification attacks and also I will be incurring a cost for the amount of network ingress the node gets which I am not willing to pay at this moment. To over come this I used Wireguard VPN server on the cloud node. I connected my mobile to the cloud node’s network via a dedicated VPN tunnel. This avoids the need of: 1. Having a public IP on the DNS server 2. Removes the challenge of blocking unwanted queries. The VPN client on my mobile opens a tunnel to my cloud VM and uses the private IP of the Pi-hole setup as the DNS server. The below screenshot is with and with out ads for comparison.

Ad block in action
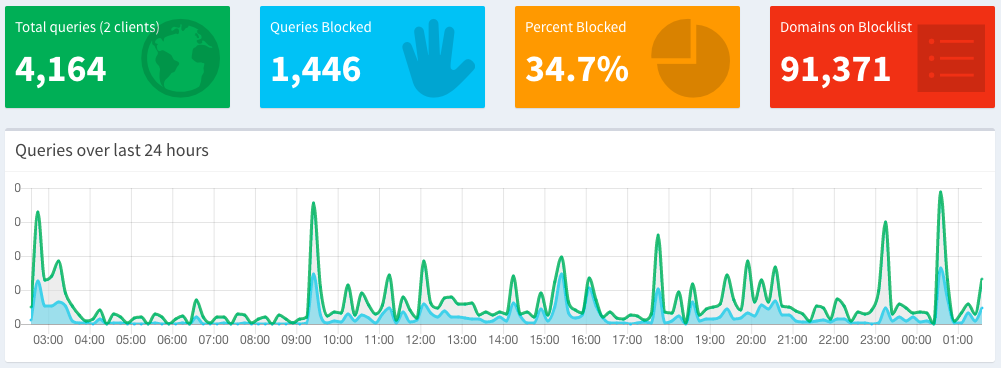
This setup is up for over 10 days and I am very happy with the outcome. Pi-hole also has a web UI that is available out of the box and gives stats of each client and the number of ads blocked by the system. Below is a screenshot of the stats over a 24 hour period and yes 34.7% of my DNS queries on my mobile are related to ads!!
Neat right. In follow-up posts I will be detailing the technical aspects along with the configuration. Do check out the excellent documentation available at Pihole for more information on how to get the most out of Pi-hole. File all bugs/feature requests at Pihole GitHub repo. If you have questions, you can ask them on Pihole discourse.
Part 2 - Cloud VM and WireGuard setup
In this step I will be covering the setup details that are required to run WireGuard and a VM on which to run it.
A cloud VM
The first ingredient is a VM. I am using DigitalOcean droplet for this purpose. I picked a Ubuntu 18.04 droplet with 1 GB Memory and 25 GB Disk. The droplet has about 1 TB in network transfer usage per month which is a lot for this requirement. I can run a few more services on the same machine later. This will cost around $5 to $6. I chose Digital Ocean’s Bangalore datacenter. As I want to use this machine for my DNS queries, I want it to be closest to my client as possible. To check the network latency I did a ping test with Google DNS server 8.8.8.8 and my server.
$ ping -c 3 8.8.8.8
PING 8.8.8.8 (8.8.8.8): 56 data bytes
64 bytes from 8.8.8.8: icmp_seq=0 ttl=56 time=16.004 ms
64 bytes from 8.8.8.8: icmp_seq=1 ttl=56 time=14.263 ms
64 bytes from 8.8.8.8: icmp_seq=2 ttl=56 time=13.957 ms

--- 8.8.8.8 ping statistics ---
3 packets transmitted, 3 packets received, 0.0% packet loss
round-trip min/avg/max/stddev = 13.957/14.832/16.004/0.714 ms

$ ping -c 3 16.22.21.21
PING 16.22.21.21 (16.22.21.21): 56 data bytes
64 bytes from 16.22.21.21: icmp_seq=0 ttl=55 time=14.650 ms
64 bytes from 16.22.21.21: icmp_seq=1 ttl=55 time=12.282 ms
64 bytes from 16.22.21.21: icmp_seq=2 ttl=55 time=11.852 ms

--- 16.22.21.21 ping statistics ---
3 packets transmitted, 3 packets received, 0.0% packet loss
round-trip min/avg/max/stddev = 11.852/12.669/14.650/1.022 ms
In a few tests I did the average ping latency is almost same as 8.8.8.8. That is promising. Let’s move to the next step.
IP packets should be allowed to be forwarded from this VM. This is done
by uncommenting the line net.ipv4.ip_forward=1 in the file
/etc/sysctl.conf and run sysctl -p for the changes to take
effect without requiring a reboot.
# sysctl -p
net.ipv4.ip_forward = 1
# cat /proc/sys/net/ipv4/ip_forward
1
Wireguard VPN setup
WireGuard is a relatively new VPN software but it is the one of the very few projects that can boast of being merged into the Linux kernel. It is available by default from kernel version 5.6. And in the words of the big man himself…
Can I just once again state my love for WireGuard and hope it gets merged soon? Maybe the code isn’t perfect, but I’ve skimmed it, and compared to the horrors that are OpenVPN and IPSec, it’s a work of art - Linus Torvalds
A couple of best parts of WireGuard which are very much required in my use case. - Establishes connections in less than 100ms. That is wicked fast! - IP roaming support - meaning I can change wifi networks or disconnect from wifi or cellular and the VPN tunnel connection won’t be lost. It just works!
The required packages are in the official ppa repo. Let’s add that to our VM and install WireGuard.
$ sudo add-apt-repository ppa:wireguard/wireguard
$ sudo apt-get update
$ sudo apt-get install wireguard-tools wireguard-dkms
I will switch to root shell and run wg to check if installation was
successful which should not output anything if everything is OK.
$ sudo -s
# wg
#
The next step is to generate the required public and private keys. I
will keep them under /etc/wireguard/keys directory. Also I will
change the permissions to allow only root to change these files.
# mkdir /etc/wireguard/keys
# cd /etc/wireguard/keys
# umask 077
WireGuard uses asymmetric public/private Curve25519 key pairs for
authentication between client and server. I will generate both the
private and public key at once by piping the private key output to tee
to save it to the file privatekey and also to forward the private
key to wg publickey which derives the public key from privatekey
and the save it to publickey.
# wg genkey | tee privatekey | wg pubkey > publickey
# ls
  privatekey  publickey
The configuration of WireGuard is in wg0.conf.
[Interface]
Address = 192.168.5.1/24
ListenPort = 51820
PrivateKey = QPvmG/xa9xPvD5XV5K5pyXeA+6x8aiCiRC82RECffGY=
- Address = 192.168.8.1/24. This line defines the IP and the subnet the
server will be running on. This needs to be a network that is not being used by the cloud VM so that it does not interfere with the routes of the VM.
- ListenPort = 51820. This is the listening port of the VPN server.
Make sure that the VM has this port open to accept UDP traffic from any where (0.0.0.0/0).
PrivateKey is the key that was generated in the previous step.
Run the command wg-quick up wg0 to start the VPN server.
# wg-quick up wg0
[#] ip link add wg0 type wireguard
[#] wg setconf wg0 /dev/fd/63
[#] ip -4 address add 10.0.0.1/24 dev wg0
[#] ip link set mtu 8921 up dev wg0
To check the status of the VPN tunnel run the command wg show
# wg show
interface: wg0
public key: vgBavl4f13wT2qbWj0OgLbDNxhls+nrjWPYngmXaIT8=
private key: (hidden)
listening port: 51820
In the next parts I will be walking through the Pi-hole setup, client configuration and validating and testing the setup.
Part 3 - Pi-hole and Client configuration
Now lets see the main ingredient the Pi-hole setup along with the client configuration.
Pi-hole Setup
The prerequisites are simple.
It requires 512mb or ram, and about 50mb of free space.
A supported operating system.
With prerequisites checked, the installation is also simple. Just run
the one step installer that takes care of all the configuration
required. One thing to remember is to select the wg0 interface that
we created for WireGuard VPN server as the network interface for
Pi-hole.
# curl -sSL https://install.pi-hole.net | bash
Client Configuration
Similar to the public/private keys generated for the VPN server, each
client also need to have a key pair. The publickey of each client
should be shared with the server and the publickey of the server
will be shared with the client.
# wg genkey | tee cl_privatekey | wg pubkey > cl_publickey
# ls
  cl_publickey cl_privatekey
The publickey of each client(my mobile phone in my case) needs to be
added to the server configuration along with the IP address that the
client will have when connected to the VPN server. The server
configuration that is the wg0.conf will effectively be:
[Interface]
Address = 192.168.5.1/24
ListenPort = 51820
PrivateKey = QPvmG/xa9xPvD5XV5K5pyXeA+6x8aiCiRC82RECffGY=

[Peer]
PublicKey = /cPFo6mwfIG3XYTJU1JeutsGzWLINdTm9NOQUriNLlg=
AllowedIPs = 192.168.5.5/32
Where PublicKey is the public key of the client generated in the
previous step and AllowedIPs is the IP that I want this client to
have when on VPN.
The client configuration file will also look similar.
[Interface]
Address = 192.168.5.5/32
ListenPort = 51820
PrivateKey = gEPGRLrDBiolZ/5P4G5bj2aq37lSwCw8ebN2P8gUwlI=
DNS = 192.168.5.1

[Peer]
Publickey = vgBavl4f13wT2qbWj0OgLbDNxhls+nrjWPYngmXaIT8=
AllowedIPs = 0.0.0.0/0, ::/0
Endpoint = 16.22.21.21:51820
In the client configuration, the PrivateKey is the private key
generated for the client in the previous step. The DNS is the IP of
the wg0 interface where Pi-hole is listening for DNS queries. The
Endpoint is the public IP of my VPN server along with the port on
which the VPN service is listening for connections. As all UDP traffic
is allowed on my The AllowedIPs in the client has to be mentioned
specially. If I set it to 0.0.0.0/0, ::/0 like above, all the
traffic from the client will be forwarded to the VPN server. This means
if I open a video on YouTube on my phone, the request is made to the VPN
server which in turn gets the content from YouTube and serves the
client. Simply put all the traffic flows through the VPN server.
If AllowedIPs is set to only the private VPN IPs (192.168.5.1/32 and
192.168.5.5/32 in my case) only the DNS traffic flows though. So on my
phone all the DNS queries go the Pi-hole IP and the subsequent requests
use the WiFi or the cellular network. This is exactly what I want.
On the client i.e, my mobile phone, I installed WireGuard client. The
client configuration file can be directly imported by clicking on the
+ icon in the WireGuard app. Once imported just connect the client
and the key symbol comes up on the top notification area showing
that the VPN tunnel is established. Below is a screenshot of both these
steps.
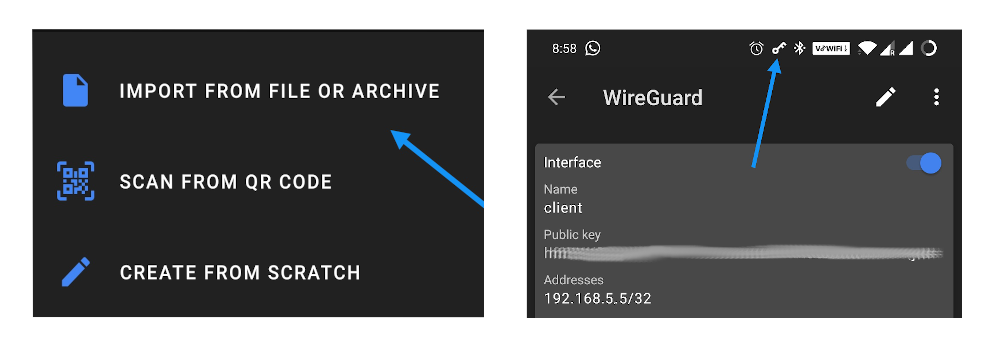
Import client config and connect to VPN
On the VPN server we can check the status with wg show command that
shows the connected peers and the last time the handshake happened along
with the data transfer for this peer.
interface: wg0
  public key: vgBavl4f13wT2qbWj0OgLbDNxhls+nrjWPYngmXaIT8=
  private key: (hidden)
  listening port: 51820

peer: /cPFo6mwfIG3XYTJU1JeutsGzWLINdTm9NOQUriNLlg=
  endpoint: 18.19.14.29:18540
  allowed ips: 192.168.5.5/32
  latest handshake: 19 seconds ago
  transfer: 2.79 MiB received, 4.64 MiB sent
This concludes the configuration required to setup the VPN server, Pi-hole instance and the client setup to go along with the server.
voilà! Now my mobile phone where ever it is will have no ads served. The list of the blocked domains are periodically updated and I can add any wildcard/regex pattern domains to add more to the list.
Part 4 - Testing
let’s see the setup in action and if the DNS server actually can perform similar to a open DNS server like 8.8.8.8.
Ad blocking
The screenshot below is a side by side comparison with and with out the VPN tunnel connected. When the tunnel is switched off, the DNS queries go to the ISP DNS server which gives the actual ad content. When the tunnel is up, the Pi-hole DNS server responds that the ad is available at 0.0.0.0 thus the client gets a null response which effectively blocks the ad.

B E A Utiful
Testing
Let me check if the actual DNS response time is comparable to a Google DNS server.
$ dig youtube.com @192.168.5.1

; <<>> DiG 9.14.3 <<>> youtube.com @192.168.5.1 ;; global options:
+cmd ;; Got answer: ;; ->>HEADER<<- opcode: QUERY, status: NOERROR,
id: 42303 ;; flags: qr rd ra; QUERY: 1, ANSWER: 1, AUTHORITY: 0,
ADDITIONAL: 1

;; OPT PSEUDOSECTION: ; EDNS: version: 0, flags:; udp: 1452 ;;
QUESTION SECTION: ;youtube.com.                   IN      A

;; ANSWER SECTION: youtube.com.            274     IN      A
216.58.199.174

;; Query time: 50 msec ;; SERVER: 192.168.5.1#53(192.168.5.1) ;;
WHEN: Tue Apr 07 23:23:54 IST 2020 ;; MSG SIZE  rcvd: 67

$ dig youtube.com @8.8.8.8

; <<>> DiG 9.14.3 <<>> youtube.com @8.8.8.8 ;; global options: +cmd
;; Got answer: ;; ->>HEADER<<- opcode: QUERY, status: NOERROR, id:
14855 ;; flags: qr rd ra; QUERY: 1, ANSWER: 1, AUTHORITY: 0,
ADDITIONAL: 1

;; OPT PSEUDOSECTION: ; EDNS: version: 0, flags:; udp: 512 ;;
QUESTION SECTION: ;youtube.com.                   IN      A

;; ANSWER SECTION: youtube.com.            299     IN      A
172.217.166.110

;; Query time: 118 msec ;; SERVER: 8.8.8.8#53(8.8.8.8) ;; WHEN: Tue
Apr 07 23:00:15 IST 2020 ;; MSG SIZE  rcvd: 56
The DNS query time when using the Pi-hole as my DNS server is around 50ms compared to 118ms when using 8.8.8.8. I can live with that :stuck_out_tongue_winking_eye:.
OK Let me not be too carried away. Unlike the open DNS servers, my server only serves 1 client and also has a little cache which makes the frequent queries resolve a little bit faster. Some day I will run dnsperf tests and see if this tiny server can take more load.
Challenges
While the setup works as per my expectation and the results are impressive, there are some challenges I have to resolve at some point. - The server is in the Bangalore region and so as long as I use it in and around that area I should have no latency issues. I have not tested this when the client is in other parts of the world.